Command for write new post!
How to write a new post!

Promptes
There are several types of prompts: tip, info, warning, and danger. They can be generated by adding the class prompt-{type} to the blockquote. For example, define a prompt of type info as follows:
1
2
  > Example line for prompt.
  {: .prompt-info }
Example line for prompt.
Example line for prompt.
Example line for prompt.
Example line for prompt.
Footnote
1
2
3
This is an example of a footnote[^1], which can be explained in detail at the end of the article.

[^1]: This is the content of the first footnote.
This is an example of a footnote1, which can be explained in detail at the end of the article.
Images
Caption
Add italics to the next line of an image, then it will become the caption and appear at the bottom of the image:
1
2

_Image Caption_
 Image Caption Test
Size
To prevent the page content layout from shifting when the image is loaded, we should set the width and height for each image.
1
{: width="300" height="400" }
Starting from Chirpy v5.0.0, height and width support abbreviations (height → h, width → w). The following example has the same effect as the above:
1
{: w="700" h="400" }
Position
By default, the image is centered, but you can specify the position by using one of the classes normal, left, and right.
Once the position is specified, the image caption should not be added.
- Normal position
1


The
normaldoesn’t work.
- Float to the left
1
{: .left }
Praesent maximus aliquam sapien. Sed vel neque in dolor pulvinar auctor. Maecenas pharetra, sem sit amet interdum posuere, tellus lacus eleifend magna, ac lobortis felis ipsum id sapien. Proin ornare rutrum metus, ac convallis diam volutpat sit amet. Phasellus volutpat, elit sit amet tincidunt mollis, felis mi scelerisque mauris, ut facilisis leo magna accumsan sapien. In rutrum vehicula nisl eget tempor. Nullam maximus ullamcorper libero non maximus. Integer ultricies velit id convallis varius. Praesent eu nisl eu urna finibus ultrices id nec ex. Mauris ac mattis quam. Fusce aliquam est nec sapien bibendum, vitae malesuada ligula condimentum.
- Float to the right
1
{: .right}
Praesent maximus aliquam sapien. Sed vel neque in dolor pulvinar auctor. Maecenas pharetra, sem sit amet interdum posuere, tellus lacus eleifend magna, ac lobortis felis ipsum id sapien. Proin ornare rutrum metus, ac convallis diam volutpat sit amet. Phasellus volutpat, elit sit amet tincidunt mollis, felis mi scelerisque mauris, ut facilisis leo magna accumsan sapien. In rutrum vehicula nisl eget tempor. Nullam maximus ullamcorper libero non maximus. Integer ultricies velit id convallis varius. Praesent eu nisl eu urna finibus ultrices id nec ex. Mauris ac mattis quam. Fusce aliquam est nec sapien bibendum, vitae malesuada ligula condimentum.
Dark/Light mode
You can make images follow theme preferences in dark/light mode. This requires you to prepare two images, one for dark mode and one for light mode, and then assign them a specific class (dark or light):
1
2
{: .light }
{: .dark }
Shadow
The screenshots of the program window can be considered to show the shadow effect:
1
{: .shadow }
Preview Image
If you want to add an image at the top of the post, please provide an image with a resolution of 1200 x 630. Please note that if the image aspect ratio does not meet 1.91 : 1, the image will be scaled and cropped.
Knowing these prerequisites, you can start setting the image’s attribute:
1
2
3
4
5
  ---
  image:
    path: /path/to/image
    alt: image alternative text
  ---
Video
Soical Media Platform

Where Platform is the lowercase of the platform name, and ID is the video ID.
The following table shows how to get the two parameters we need in a given video URL, and you can also know the currently supported video platforms.
| Video URL | Platform | ID |
|---|---|---|
| https://www.youtube.com/watch?v=wd-ALc7BoNc | youtube | wd-ALc7BoNc |
| https://www.bilibili.com/video/BV1Vs411b7xq | bilibili | BV1Vs411b7xq |
| https://www.twitch.tv/videos/1634779211 | twitch | 1634779211 |
For example,
youtube
bilibili
Videos Files
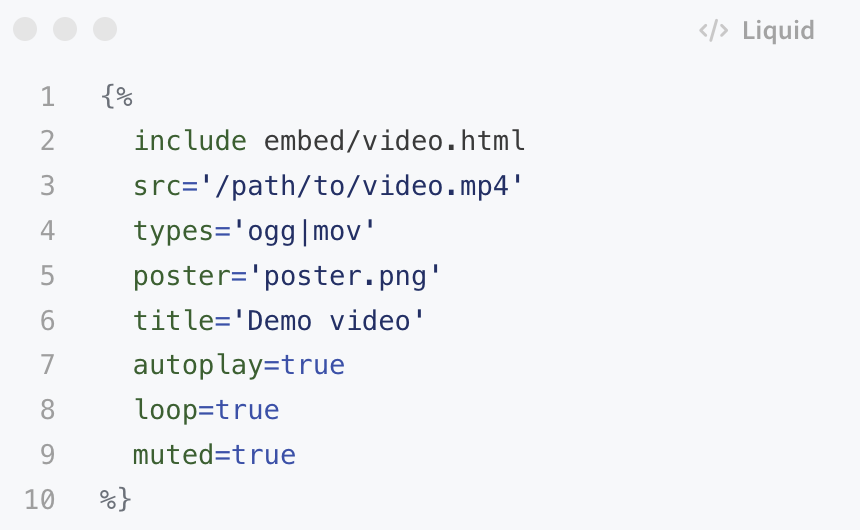
If you want to embed a video file directly, use the following syntax:

Where URL is a URL to a video file e.g. /path/to/sample/video.mp4.
You can also specify additional attributes for the embedded video file. Here is a full list of attributes allowed.
poster='/path/to/poster.png'— poster image for a video that is shown while video is downloadingtitle='Text'— title for a video that appears below the video and looks same as for imagesautoplay=true— video automatically begins to play back as soon as it canloop=true— automatically seek back to the start upon reaching the end of the videomuted=true— audio will be initially silencedtypes— specify the extensions of additional video formats separated by. Ensure these files exist in the same directory as your primary video file.
Consider an example using all of the above:
Syntax
Inline Code
1
`inline code part`
inline code part
Filepath Highlight
1
`/path/to/a/file.extend`{: .filepath}
/path/to/a/file.extend
Code Block
Markdown symbols ` ``` ` can easily create a code block as follows:
1
2
3
    ```
    This is a plaintext code snippet.
    ```
Specifying the Filename
You may have noticed that the code language will be displayed at the top of the code block. If you want to replace it with the file name, you can add the attribute file to achieve this:
1
2
3
4
    ```shell
    # content
    ```
    {: file="path/to/file" }
1
2
# content
For example,
Mathematics
We use MathJax to generate mathematics. For website performance reasons, the mathematical feature won’t be loaded by default. But it can be enabled by:
1
2
3
  ---
  math: true
  ---
After enabling the mathematical feature, you can add math equations with the following syntax:
- Block math should be added with
$$ math $$with mandatory blank lines before and after$$- Inserting equation numbering should be added with
$$\begin{equation} math \end{equation}$$ - Referencing equation numbering should be done with
\label{eq:label_name}in the equation block and\eqref{eq:label_name}inline with text (see example below)
- Inserting equation numbering should be added with
- Inline math (in lines) should be added with
$$ math $$without any blank line before or after$$ - Inline math (in lists) should be added with
\$$ math $$
1
2
3
4
5
6
7
8
9
10
11
12
13
14
15
16
17
18
19
20
21
22
23
24
25
26
<!-- Block math, keep all blank lines -->

$$
LaTeX_math_expression
$$

<!-- Equation numbering, keep all blank lines  -->

$$
\begin{equation}
	I = \frac{ n \sum\limits_{i=1}^n \sum\limits_{j=1}^n w_{ij} (x_i - \bar{x}) (x_j - \bar{x}) }{ \sum\limits_{i=1}^n \sum\limits_{j=1}^n w_{ij} \sum\limits_{i=1}^n (x_i - \bar{x})^2 }
  \label{eq:label_name}
\end{equation}
$$

Can be referenced as \eqref{eq:label_name}.

<!-- Inline math in lines, NO blank lines -->

"Lorem ipsum dolor sit amet, $$ LaTeX_math_expression $$ consectetur adipiscing elit."

<!-- Inline math in lists, escape the first `$` -->

1. \$$ LaTeX_math_expression $$
2. \$$ LaTeX_math_expression $$
3. \$$ LaTeX_math_expression $$
\[LaTeX_math_expression\] \[\begin{equation} I = \frac{ n \sum\limits_{i=1}^n \sum\limits_{j=1}^n w_{ij} (x_i - \bar{x}) (x_j - \bar{x}) }{ \sum\limits_{i=1}^n \sum\limits_{j=1}^n w_{ij} \sum\limits_{i=1}^n (x_i - \bar{x})^2 } \label{eq:label_name} \end{equation}\]Starting with
v7.0.0, configuration options for MathJax have been moved to file assets/js/data/mathjax.js, and you can change the options as needed, such as adding extensions. If you are building the site viachirpy-starter, copy that file from the gem installation directory (check with commandbundle info --path jekyll-theme-chirpy) to the same directory in your repository.
Can be referenced as \eqref{eq:label_name}.
“Lorem ipsum dolor sit amet, \(LaTeX_math_expression\) consectetur adipiscing elit.”
- \(LaTeX_math_expression\)
- \(LaTeX_math_expression\)
- \(LaTeX_math_expression\)
This is the content of the first footnote. ↩